
*************************************************************************************************
Caution: There will be tonnes of photos included in this post. Beware of dizziness. Please do not drive or operate any machinery in case of drowsiness
*************************************************************************************************
So this is my 2nd tutorial. I have made myself clear that I only wanted, repeat after me, ONLY, to share extremely simple tutorials to all DIY junkie out there (yuhuu~~~). However, you guys just have to bear with me this only entry as I am posting about 20 images at once. Yup, do and please imagine the complexity you will encounter in a minute time from now....(mr.cricket chirping...)...
Do take note, this time around I sew in inches (still haven't make up my mind yet on which one is better mm/cm or inches). I am using Gusset Zipper technique to complement the whole scene.
Today (well, yesterday to be exact) is my Ibu's birthday. Ibu is mother/mom/mummy/mama/etc. in Malay. She is 54 today woot woots. Thus, I opted to sew a Customized Tote Bag for her to tag along to places that she goes. First, I bluffed on the reason why I made that particular bag, hehee... to test her new industrial sewing machine (which literally is my new toy machine). Afterwards I finalized the stitching part, then, I sketch the Tote Bag specially for Ibu! (if you noticed, I normally sketch first then I sew... it is an exceptional this time as I need to bluff bahaha). A gentle reminder, once again... please bear with the numbers of the images below...

::::::::::::::::::::::::::::::::::::::::::::::::::::::::::::::::::::::::::::::::::::::::::::::::::::
*Tips #1: Please add some 0.5" for every edges of cut fabric for allowances*
::::::::::::::::::::::::::::::::::::::::::::::::::::::::::::::::::::::::::::::::::::::::::::::::::::
*Tips #1: Please add some 0.5" for every edges of cut fabric for allowances*
::::::::::::::::::::::::::::::::::::::::::::::::::::::::::::::::::::::::::::::::::::::::::::::::::::
You will need 3 types of fabric for OUTER BODY / INNER BODY / SIDE OUTER & GUSSET ZIPPER (scroll over to know more)
I used Canvas / Polyester / Linen for each respective part.
Bought the Polyester (this is quite rare at Malaysian normal fabric store) at Daiso for RM5/yard I guess.
Bought the Polyester (this is quite rare at Malaysian normal fabric store) at Daiso for RM5/yard I guess.
Oh, you'll also need Cotton Webbing (now I know the actual name of these, I named it "Bag String" previously...lame!)

As of Canvas fabric:
Make 2 pieces of 15" x 14" (OUTER BODY)
As of Polyester fabric:
Make also 2 pieces of 19" x 12" (LOWER INNER BODY)
2 pieces of 19" x 2" (UPPER INNER BODY)
And 1 piece of 8" x 3.5" (POCKETS)
*You'll sew the Gusset Zipper in between these Upper & Lower Inner Body later*
And 1 piece of 8" x 3.5" (POCKETS)
*You'll sew the Gusset Zipper in between these Upper & Lower Inner Body later*

As of the Linen fabric:
Make 2 pieces of 14" x 4" (OUTER SIDE BODY)
And make 4 pieces of 15" x 2" (GUSSET ZIPPER APPENDAGES)

First, you have to sew the pocket to one of the Lower Inner Body
:::::::::::::::::::::::::::::::::::::::::::::::::::::::::::::::::::::::::::::::::::::::::::
:::::::::::::::::::::::::::::::::::::::::::::::::::::::::::::::::::::::::::::::::::::::::::
*Tips #2: always sew the most uncared for, the most inner part first*
:::::::::::::::::::::::::::::::::::::::::::::::::::::::::::::::::::::::::::::::::::::::::::
:::::::::::::::::::::::::::::::::::::::::::::::::::::::::::::::::::::::::::::::::::::::::::
Fold twice the upper part of pocket (creating a hidden hem) and pin'em.
Fold once the lower part and pin'em.
Sew along these pinned edges.

Now, place your hem-ed pocket at the middle of the right side of (any) Lower Inner Body; at 2" from its upper edge and pin'em.
Because we didn't sew the side edges of the pocket just now, you need to fold'em once and pin'em to the Body.
And start sewing along the dotted lines as above (together with a line in the middle to create 2 pockets instead of 1 huge space).
Do not sew the upper part or else it won't be functioning as well... a pocket~

Place those Linen Outer Side Body to each right and left part of 1 piece of Canvas Outer Body (right sides facing each other), pin'em and sew along the dotted/pinned lines.
Take another piece of Canvas Outer Body and pin it to the rest of the prev. combination and sew'em creating an illusion of a box without cap or base (could you get this?)
Then, you sew the bottom of the combination leaving only 1 open (un-sewn) upper part.
:::::::::::::::::::::::::::::::::::::::::::::::::::::::::::::::::::::::::::::::::::::::::::::::::::::::::::::::::::::::::::::
*Tips #3: Always, and always trim off each sewn edge for a cleaner look*
*Tips #4: Because no hem/edges will show off on this Tote bag, we might as well forget about
"Overlock-ing" the hem using machine*
::::::::::::::::::::::::::::::::::::::::::::::::::::::::::::::::::::::::::::::::::::::::::::::::::::::::::::::::::::::::::::

By open up the combination, create a box resemblance (maybe by placing a 1.5L water bottle inside it haha).
Now, you will have a triangular appendage each side like those (this have to go away later).
Mark along like the above, 2" from the corner-end and pin'em.

Sew the marked line and trim the triangles off (2 of them!).

For the Gusset Zipper Appendages; place 2 pieces of Linen for the Gusset (right sides facing each other), pin along these dotted lines and sew'em. You will get 2 sets.
You will later place a 24" zipper in the middle.
::::::::::::::::::::::::::::::::::::::::::::::::::::::::::::::::::::::::::::::::::::::::::::::::::::::::::::::::::::::::::::::::
*Tips #5: I should sewn a "cover" at each zipper end but to reduce the length of this entry, yup, I am skipping'em tihee*
::::::::::::::::::::::::::::::::::::::::::::::::::::::::::::::::::::::::::::::::::::::::::::::::::::::::::::::::::::::::::::::::

Once sewn, turn those appendages inside out.
Place both of them on the zipper (well at the middle of the whole length I guess, with the right side of the zipper facing you), pin'em and sew along those dotted lines.

Carefully, place the Gusset combination on top of a Lower Inner Body (with pockets) at the upper edge, and 1 piece of Upper Inner Body (with wrong side facing you) on top of those combination. Pin'em and sew along the dotted lines.

Now, do the same for the other half of Inner Body combination.
Once sewn, trim off the hem for a cleaner look.

This is how the finished Inner Body will look like (wrong sides must be ultimately facing you).
Center the combination and pin'em and sew along those dotted lines.
Be careful not to sew the zipper end along, you may fold them and pin first to avoid these.

By referring on how do you trim off the triangles of the Outer Body, do the same for your Inner Body.

And the trickiest part of all.
Face both Outer and Inner body (wrong sides still facing you) like the above, and pin along the dotted lines leaving a 10" gap on any front Body side. Sew'em.
::::::::::::::::::::::::::::::::::::::::::::::::::::::::::::::::::::::::::::::::::::::::::::::::::::::::::::::::::::::::::::::::::
*Tips #6: This was a terrible mistake of mine, maybe next time we should opt by leaving the gap at the bottom hem of Inner Body for turning the bag inside-out conveniently*
::::::::::::::::::::::::::::::::::::::::::::::::::::::::::::::::::::::::::::::::::::::::::::::::::::::::::::::::::::::::::::::::::

Turn the bag inside out and... voila~
And remember to sew along those dotted edge to close up the gap and for adding body to the bag.

See the difference?

Okay. The Final part.
Prepare 2 pieces of 30" long Cotton Webbing.
Mark at 3" from each end.
Now, fold twice to create the (hidden) hem of about 1" long and pin'em.

Place each end at 4" from front Body edge and 1.5" from upper Body edge like those.
Sew'em.
Next, sew each of 4 edges of the bag to add some body as our last touch!

Yippie Yayyy~
#1: The Front ("The World's Greatest Ibu" badge sketch)
#2: The Back ("Take Me with You to These Places List")
#3: The Gusset zipper
#4: The water-proof Polyester Inner
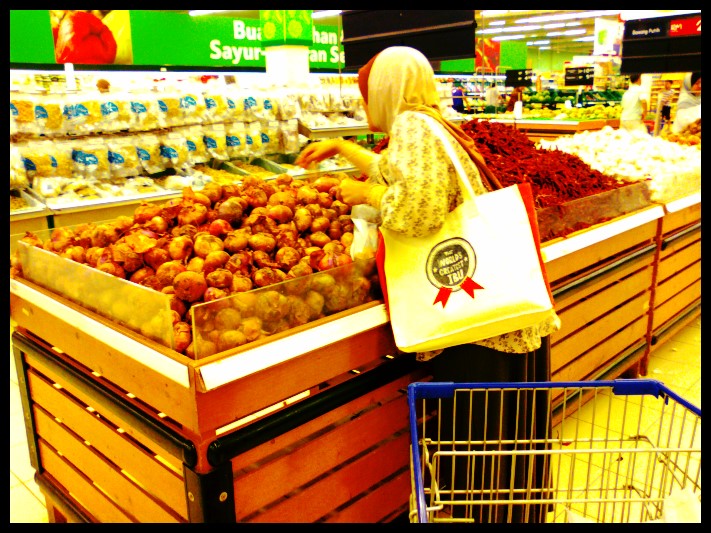
Tick on Checkbox #3: Tote Me to Tesco!
Ibu love this piece and laugh at the back wordings. Yeayyy happy that my Ibu love this part of me, myself.
Till then.

No comments:
Post a Comment